Building your own PC these days is easier, more exciting, and more rewarding than ever before. Let’s explore today how to build a pc step by step.
With cutting-edge hardware, powerful customization options, and the ability to tailor every component to your needs, DIY PC building is no longer just for tech enthusiasts—it’s for everyone!
Imagine having a custom-built machine that perfectly fits your gaming setup, work requirements, or creative projects—without the unnecessary bloat of pre-built systems.
Want a gaming beast? A workstation powerhouse? Or a sleek and silent office PC?
You get to decide every detail, from the CPU to the RGB lighting. And the best part? You can often build a more powerful PC at a lower cost compared to pre-assembled options.
Why Build Your Own PC?
✔ Ultimate Customization – Choose components that match your performance needs and aesthetics.
✔ Better Performance – Optimize every part to run exactly how you want, with no pre-installed bloatware.
✔ Cost Savings – Get more value for your money compared to pre-built systems.
✔ Future-Proofing – Easily upgrade individual parts instead of replacing an entire system.
✔ A Fun & Rewarding Experience – Learn how computers work while creating something uniquely yours.
Who Should Follow This Guide?
Gamers 🎮 – Build a high-performance gaming rig to dominate your favorite titles.
Creative Professionals 🎨 – Editors, designers, and video creators need a custom PC for heavy workloads.
Tech Enthusiasts & Beginners 🔧 – Whether you’re experienced or a first-timer, this step-by-step guide will make PC building simple and stress-free.
Students & Home Office Users 🏡 – Get a budget-friendly and efficient system for studies or remote work.
🚀 Ready to start? Let’s build your dream PC from scratch!
Follow this beginner-friendly, step-by-step guide and assemble your own custom machine with confidence.
Let’s dive in!
This guide is part of our Troubleshooting Guides, where we provide step-by-step solutions to help you set up, fix, and optimize technology with confidence.
Table of Contents
Toggle1. Understanding the Basics of PC Building
What is DIY PC Building?
DIY PC building is the process of assembling your own computer from individual components, rather than buying a pre-built system.
It gives you complete control over every part, from the processor to the case design, ensuring that your PC meets your specific needs—whether it’s for gaming, productivity, or a powerful workstation.
Unlike pre-assembled computers, a DIY-built PC is free from unnecessary software, allowing for better performance and upgradability over time.
Key Considerations Before You Start
Before jumping into building a PC, it’s important to consider a few key factors:
✔ Compatibility: Ensuring all parts work together (CPU, motherboard, RAM, GPU).
✔ Purpose of the Build: Are you building a gaming PC, a work-from-home machine, or a content creation workstation? Your goal will determine the components you choose.
✔ Cooling & Airflow: High-performance PCs generate heat, so selecting the right cooling solution is crucial.
✔ Upgradability: Future-proofing your PC by choosing a motherboard with extra RAM slots or PCIe expansion options ensures long-term value.
Budget Planning & Purpose: Gaming, Productivity, or Workstation?
Your budget will influence the type of PC you can build. Here’s how to plan based on your needs:
💻 Budget PC ($500 – $800) – Ideal for everyday tasks, office work, and light gaming.
🎮 Mid-Range Gaming PC ($800 – $1500) – A powerful setup for 1080p or 1440p gaming with a good CPU and GPU.
🚀 High-End Gaming PC ($1500 – $2500+) – Best for 4K gaming, streaming, and high FPS performance.
🎬 Workstation PC ($2000 – $4000+) – Designed for video editing, 3D rendering, and machine learning, requiring high-core CPUs and large amounts of RAM.
Before assembling a PC, understanding how different components affect performance, compatibility, and long-term value is essential. Our Tech Buying Guide covers general considerations to help you choose the right hardware based on your needs, budget, and future upgrade plans.
Ready to Build? Let’s Move to Selecting the Right Components!
Now that you understand the basics, it’s time to dive into choosing the best parts for your DIY computer—from processors to power supplies.
2. Choosing the Right Components for Your PC
Selecting the right components is the most crucial step in building a high-performance and reliable PC.
Whether you’re assembling a gaming rig, a productivity setup, or a workstation, each component plays a significant role in performance, compatibility, and future upgradability.
This section will help you pick the best parts using a structured PC building guide, ensuring your system is optimized for 2025.
a. The PC Case—Choosing the Right Size
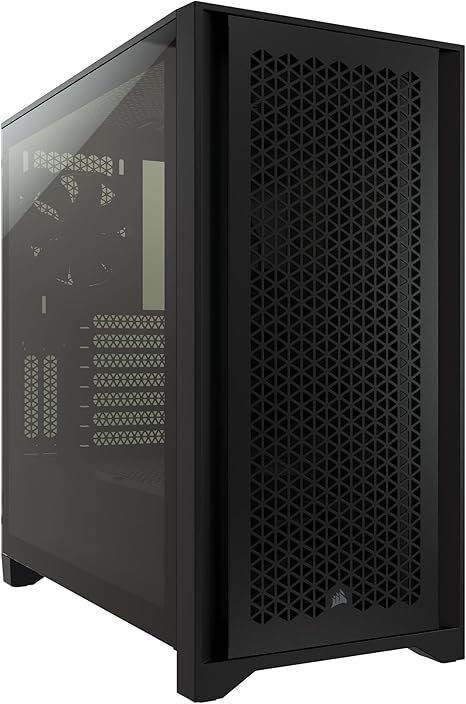
The PC case determines the size, airflow, and aesthetics of your build. Choose based on motherboard compatibility and cooling needs:
- ATX Cases (Mid & Full-Tower) – Best for gaming PCs & workstations, offering more space for GPUs and cooling.
- Micro-ATX Cases – Compact and affordable but with fewer expansion slots.
- Mini-ITX Cases – Ultra-compact builds with limited space but great for portable PCs.
📌 Tip: If you want easy upgrades and better cooling, go for a Mid-Tower ATX case.
b. The Motherboard—Compatibility & Features
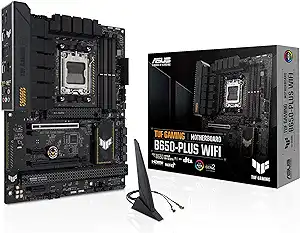
The motherboard is the backbone of your PC, connecting all components. Consider these factors:
- Chipset Selection – Intel (Z790, B760) or AMD (X670, B650) for 2025 builds.
- Socket Compatibility – Ensure the motherboard matches your CPU socket (Intel LGA1700 or AMD AM5).
- Expansion & Features – More PCIe slots, USB ports, and RAM slots mean better upgradability.
📌 Tip: For gaming or professional use, choose a motherboard with PCIe 5.0 support for future-proofing.
c. The Processor (CPU) – AMD vs. Intel
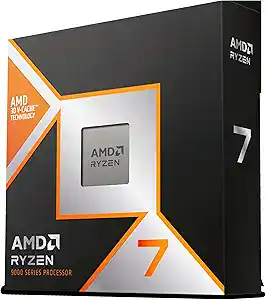
Your CPU dictates the speed and multitasking capabilities of your PC.
- Intel 14th-Gen Core i5/i7/i9 – Best for gaming and general use with high clock speeds.
- AMD Ryzen 7000 Series – Ideal for workstations & gaming with strong multi-core performance.
📌 Tip: Gamers should prioritize high clock speeds, while workstation users should focus on core count.
d. Graphics Card (GPU) – Gaming vs. Workstation
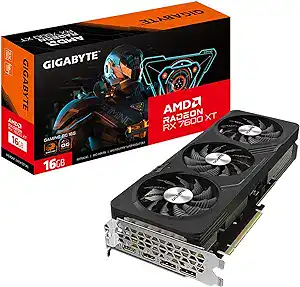
If you’re gaming or doing video editing, 3D rendering, or AI work, a powerful GPU is essential.
- Best Gaming GPUs (2025) – NVIDIA RTX 4070/4080, AMD RX 7800 XT.
- Best Workstation GPUs – NVIDIA RTX 5000 Ada, AMD Radeon Pro W7000.
📌 Tip: Gamers should prioritize FPS and ray tracing, while workstations need more VRAM for rendering.
e. Memory (RAM) – DDR5 vs. DDR4
- DDR5 RAM – Faster speeds and better efficiency (best for future-proofing).
- DDR4 RAM – Still a great choice for budget builds.
- How much RAM?
- 16GB – Budget builds and general use.
- 32GB – Gaming and content creation.
- 64GB+ – Workstations and heavy multitasking.
📌 Tip: Always choose dual-channel RAM for better performance.
f. Storage – HDD, SSD, or NVMe SSD?
- HDDs (Hard Drives) – Cheap, slow, great for bulk storage.
- SATA SSDs – Faster than HDDs, affordable, good for OS and games.
- NVMe SSDs (PCIe 4.0/5.0) – Ultra-fast speeds, best for gaming & professional work.
📌 Tip: Use an NVMe SSD for the OS and a HDD/SSD for additional storage.
g. Power Supply Unit (PSU) – How Much Wattage Do You Need?
Your PSU powers everything, so choose wisely:
- 500W-750W – Budget and mid-range builds.
- 850W-1000W – High-end gaming PCs with powerful GPUs.
- 1000W+ – Workstations & extreme overclocking.
📌 Tip: Go for a modular PSU to reduce cable clutter and improve airflow.
h. CPU Cooling – Air vs. Liquid Cooling
- Air Coolers – Budget-friendly, reliable, and great for most builds.
- AIO Liquid Coolers – Best for high-performance gaming & overclocking.
📌 Tip: For high-end CPUs, a 240mm+ AIO liquid cooler is recommended.
i. Case Cooling & RGB Fans – Why It Matters
- Airflow is crucial for performance and longevity.
- More fans = better cooling, but placement is key (intake & exhaust).
- RGB Fans & Aesthetics – For those who love stylish builds.
📌 Tip: At least 3-4 case fans (2 intake, 2 exhaust) improve airflow & temps.
j. Optional Components

Want extra functionality or aesthetics? Consider:
- Wi-Fi Cards – If your motherboard lacks built-in Wi-Fi.
- Capture Cards – For streaming & content creation.
- Custom Sleeved Cables – For a sleek, organized build.
- RGB Strips & Smart Lighting – To customize the look of your PC.
📌 Tip: For gaming & streaming PCs, a capture card is a great addition.
Now, Let’s Start Assembling Your PC! 🚀
Now that you’ve chosen your PC parts, it’s time to move on to the step-by-step assembly process. In the next section, we’ll install each component, ensuring a smooth, error-free build! 💻🔧
3. How to Build a PC Step by Step
Now that you have gathered all your components, it’s time to assemble your PC.
This process might seem overwhelming, but by following these step-by-step instructions, you’ll have a fully functional system in no time!
Whether you’re a beginner or an experienced builder, this detailed guide will ensure that your PC is assembled correctly, safely, and efficiently.
Step 1: Gathering Your Tools & Preparing the Workspace
Before you start, make sure you have the right tools and a clean workspace.
Essential Tools You’ll Need:
✔ Phillips-head screwdriver—The most commonly used tool for PC building.
✔ Anti-static wrist strap – Prevents electrostatic discharge (ESD), which can damage sensitive components.
✔ Zip ties & cable management tools – Helps in organizing cables for airflow and aesthetics.
✔ Thermal paste – Needed for installing the CPU cooler (some coolers come pre-applied with thermal paste).
Setting Up a Static-Free Workspace
To avoid damaging components, follow these precautions:
- Work on a flat, non-carpeted surface.
- Touch a metal surface before handling PC parts to discharge static electricity.
- Avoid wearing wool or socks on carpeted floors while assembling.
Step 2: Installing the CPU on the Motherboard
The CPU (Processor) is the brain of your computer. Installing it is one of the most delicate steps, but following the instructions carefully will make it easy.
How to Install an Intel or AMD CPU:
- Locate the CPU socket on your motherboard and lift the retention arm or latch.
- Align the CPU with the socket:
- Intel CPUs: Match the gold triangle on the CPU with the triangle marker on the socket.
- AMD CPUs: Align the notches on the CPU with the socket grooves.
- Gently place the CPU into the socket without applying pressure.
- Lock it in place by securing the retention arm or latch.
How to Apply Thermal Paste Correctly
- If your CPU cooler does not have pre-applied thermal paste, apply a pea-sized drop in the center of the CPU.
- When the cooler is mounted, it will spread the paste evenly.
Step 3: Installing RAM (Memory Modules)
How to Install RAM Correctly for Maximum Performance:
- Identify the correct RAM slots using your motherboard’s manual. For dual-channel mode, install the RAM in alternate slots (e.g., A2 and B2).
- Open the latches on the RAM slots.
- Align the RAM module with the notch in the slot and firmly press down until it clicks into place.
- Close the retention clips to lock the RAM.
📌 Tip: If your system doesn’t boot, try re-seating the RAM modules.
Step 4: Installing an M.2 NVMe SSD (Optional)
An M.2 NVMe SSD provides lightning-fast speeds compared to SATA SSDs or HDDs.
How to Install an M.2 SSD:
- Locate the M.2 slot on your motherboard.
- Unscrew the retention screw on the M.2 slot.
- Insert the SSD at a 30-degree angle into the slot.
- Gently press it down and secure it with the screw.
📌 Tip: If your motherboard has a heatsink for the M.2 SSD, install it to improve cooling.
Step 5: Installing the Motherboard into the Case
Steps to Secure the Motherboard:
- Install the I/O shield in the case (if required).
- Align the motherboard with the standoff screws in the case.
- Secure it using screws, ensuring it’s firmly in place.
Step 6: Installing the CPU Cooler
Your cooling solution will depend on whether you’re using an air cooler or an AIO (All-in-One) liquid cooler.
Installing an Air Cooler:
- Align the heatsink with the CPU mounting brackets.
- Secure it with the provided screws.
- Plug the cooler’s fan cable into the CPU_FAN header on the motherboard.
Installing an AIO Liquid Cooler:
- Mount the radiator in the top or front of the case.
- Secure the pump onto the CPU using the provided mounting bracket.
- Connect the AIO power cables to the appropriate motherboard headers.
📌 Tip: Make sure the CPU cooler fan is facing the right airflow direction.
Step 7: Installing the Power Supply Unit (PSU) and Routing Cables
How to Install the PSU Correctly:
- Insert the PSU into the PSU shroud at the bottom of the case.
- Secure it with four screws at the back.
- Route power cables behind the case for clean cable management.
📌 Tip: Use a modular PSU for easier cable organization.
Step 8: Installing Additional Storage Drives (SATA HDD/SSD)
- Mount the HDD or SSD in a drive bay or SSD bracket.
- Connect a SATA data cable to the motherboard.
- Connect a SATA power cable from the PSU.
Step 9: Installing the Graphics Card (GPU) – If Required
- Remove the PCIe slot covers on the case.
- Insert the GPU into the PCIe x16 slot on the motherboard.
- Secure it using screws and connect power cables (if required).
Step 10: Connecting Case Fans and RGB Lighting
- Plug fans into the motherboard’s fan headers or a fan hub.
- Connect RGB lighting to the RGB controller or motherboard.
📌 Tip: Ensure proper airflow direction (intake at the front, exhaust at the top/rear).
Step 11: Cable Management for a Clean Look
- Use zip ties to group cables together neatly.
- Route cables behind the motherboard tray to improve airflow.
Step 12: Powering On & Booting to BIOS
Checklist Before Powering On:
✔ Ensure all power cables are connected (CPU, GPU, Motherboard, Storage).
✔ Make sure all fans spin up when powered on.
✔ Monitor display should turn on and enter BIOS/UEFI settings.
Entering BIOS & Configuring Settings:
- Press DEL or F2 during boot to enter BIOS.
- Check CPU, RAM, and Storage are detected.
- Set XMP Profile for RAM (to run at full speed).
- Ensure boot priority is set to your installation USB drive.
📌 Tip: If there are issues, check for loose connections before troubleshooting.
Step 13: Installing an Operating System (Windows/Linux/macOS Hackintosh)
How to Install Windows/Linux:
- Create a bootable USB using Rufus (for Windows) or Balena Etcher (for Linux).
- Insert the USB drive and boot into the installation setup.
- Follow the on-screen instructions to install the OS.
- Install necessary drivers & updates from your motherboard’s website.
📌 Tip: After installation, enable Windows security settings & install an antivirus for protection.
Your PC is Now Ready! 🚀
Congratulations! 🎉 You’ve successfully built your custom PC from scratch. Now, it’s time to optimize and test your system to ensure it runs at peak performance.
🔧 Next Up: Troubleshooting & Optimizing Your PC for Maximum Performance! 💻
4. Troubleshooting Common PC Building Issues
Building a PC is an exciting process, but sometimes, things don’t go as planned.
If your PC doesn’t turn on, you see a blank screen, or experience random shutdowns, don’t panic! Most issues can be fixed with a few simple troubleshooting steps.
Below, we’ll cover common PC building problems and how to resolve them.
PC Won’t Turn On? Here’s How to Fix It
If you press the power button and nothing happens (no lights, no fans spinning), follow these steps:
✔ Check the Power Connection
- Ensure the power supply unit (PSU) switch is turned ON.
- Verify that the power cable is plugged in securely at both the PSU and the wall socket.
- Try a different power outlet or power strip.
✔ Confirm the Power Button Connection
- Double-check that the front panel power connectors are correctly plugged into the motherboard.
- Refer to the motherboard manual to ensure the power switch pins are properly connected.
✔ Verify PSU Functionality
- If the PC still doesn’t turn on, try the paperclip test:
- Unplug everything from the PSU except the 24-pin motherboard cable.
- Use a paperclip to bridge the green wire and any black wire in the 24-pin connector.
- If the PSU fan doesn’t spin, your power supply may be faulty and needs replacement.
✔ Check for Loose Cables
- Ensure the CPU power cable (8-pin EPS connector) and motherboard power cable (24-pin ATX connector) are fully seated.
- If using a GPU, verify that the PCIe power cables are connected.
📌 Still Not Working? Try booting with only essential components (CPU, RAM, motherboard, PSU). If it powers on, the issue could be with storage drives, GPU, or case connections.
Debugging RAM, CPU, and GPU Installation Issues
If your PC turns on but doesn’t display anything, the issue could be related to RAM, CPU, or GPU installation.
RAM Issues: PC Beeping or Not Booting
- Try reseating the RAM – remove it, clean the contacts, and reinstall it firmly.
- Test one RAM stick at a time in different slots to rule out faulty memory.
- Ensure the RAM is installed in dual-channel mode (check the motherboard manual for the correct slots).
- Enable XMP in BIOS for proper RAM speed settings.
CPU Issues: No Boot or Overheating
- Make sure the CPU is properly seated in the socket.
- If the PC turns on but shuts off quickly, check if thermal paste was applied correctly.
- Verify that the CPU cooler is mounted tightly and plugged into the CPU_FAN header.
GPU Issues: No Display or Artifacts
- If using a dedicated GPU, ensure your monitor is plugged into the GPU, not the motherboard.
- Re-seat the graphics card in the PCIe slot and secure it with screws.
- Ensure that the GPU power connectors are firmly connected to the PSU.
📌 If your motherboard has debug LEDs, check for errors related to CPU, RAM, or GPU.
How to Check for Overheating and Fix Airflow Problems
If your PC runs hot, crashes randomly, or shuts down unexpectedly, overheating could be the culprit.
✔ Check CPU & GPU Temperatures
- Use HWMonitor, Core Temp, or MSI Afterburner to check your CPU/GPU temperatures.
- Idle temps should be 30-45°C, while gaming or load temps should be under 80°C.
✔ Improve Case Airflow
- Ensure front fans are intake and rear/top fans are exhaust for proper airflow.
- Add more case fans if needed, and clean dust filters regularly.
- Organize cables properly to prevent airflow blockages.
✔ Reapply Thermal Paste
- If the CPU or GPU is overheating, remove the cooler and apply a fresh layer of thermal paste.
✔ Check Fan Speeds in BIOS
- Enter BIOS and adjust the fan curve for better cooling.
- If fans aren’t spinning, ensure they are connected to the correct fan headers.
Troubleshooting PC issues can be frustrating, but by following these steps, you’ll be able to identify and fix most common problems. If all else fails, consult your motherboard’s manual, check for error codes, or seek help from online PC building communities.
🚀 Your PC is almost ready! Now, let’s move on to optimizing your system for maximum performance! 💻
5. Optimizing Your Newly Built PC for Performance
Now that your PC is assembled and running, it’s time to fine-tune its performance.
Optimizing your system ensures faster boot times, smoother multitasking, and better gaming or productivity performance.
This section covers essential BIOS tweaks, overclocking considerations, and must-have software to keep your system running at peak efficiency.
BIOS Tweaks for Better Performance
The BIOS (Basic Input/Output System) is the firmware that controls your motherboard and system settings. Making a few adjustments can unlock your PC’s full potential.
Key BIOS Settings to Optimize:
✔ Enable XMP (Extreme Memory Profile) for RAM
- By default, RAM runs at lower speeds than advertised.
- Enable XMP (for Intel) or DOCP/EXPO (for AMD) in BIOS to run RAM at its rated speed.
✔ Set Boot Priority for Faster Startups
- Go to the Boot section in BIOS and set your primary SSD as the first boot device.
✔ Check CPU & Fan Settings
- Ensure that all fans are detected and adjust fan curves for better cooling and noise control.
✔ Update BIOS (Optional but Recommended)
- If your motherboard has a newer BIOS update, install it to improve stability and compatibility with newer hardware.
📌 Tip: Don’t change settings randomly—always research before modifying BIOS settings.
Overclocking (CPU/GPU) – Should You Do It?
Overclocking is the process of increasing the speed of your CPU or GPU beyond factory settings. While it boosts performance, it can also lead to higher power consumption and heat generation.
CPU Overclocking
- If using an Intel “K” series or AMD Ryzen unlocked CPU, you can overclock using BIOS settings or software like Ryzen Master.
- Increase the CPU multiplier gradually and stress test with Cinebench or Prime95.
- Monitor temperatures to keep them under 85°C.
GPU Overclocking
- Use software like MSI Afterburner to increase clock speeds and adjust fan curves.
- Test stability with 3DMark or Unigine Heaven Benchmark.
📌 Should You Overclock?
- Yes, if you want extra performance for gaming, rendering, or high-intensity workloads.
- No, if you prefer system stability, power efficiency, and lower temperatures.
Software & Utilities for PC Maintenance
Keeping your PC clean, fast, and secure is essential. Here are some must-have tools for maintenance and optimization:
Performance Optimization Tools
- CCleaner – Removes junk files & speeds up system performance.
- Malwarebytes – Protects against malware and viruses.
- Autoruns – Disables unnecessary startup programs for faster boot times.
Hardware Monitoring Tools
- HWMonitor / Core Temp – Monitors CPU & GPU temperatures.
- CrystalDiskInfo – Checks SSD/HDD health and lifespan.
- MSI Afterburner – Monitors GPU temps, overclocking, and fan control.
Driver & BIOS Updaters
- Driver Booster – Keeps drivers up to date for better compatibility.
- Manufacturer’s BIOS Utility – Updates motherboard firmware for bug fixes.
📌 Tip: Set a monthly maintenance schedule to clean your system, update drivers, and check temps.
By tweaking BIOS settings, optimizing software, and considering overclocking, you can unlock the full power of your PC. Whether you built it for gaming, productivity, or creative work, a well-optimized PC will run smoother, cooler, and faster for years to come.
You Can Also Read These Articles:
Conclusion: Build Your Dream PC with Confidence!
Congratulations! 🎉 You’ve successfully navigated through the ultimate DIY PC building guide—from choosing the right components to optimizing your system for peak performance.
Whether you built a powerful gaming rig, a high-speed workstation, or a budget-friendly everyday PC, you now have a custom machine tailored to your needs.
Building your own PC is more than just assembling parts—it’s about learning, creating, and taking control of your computing experience.
Unlike pre-built systems, a DIY PC gives you complete freedom to upgrade, optimize, and personalize your setup for years to come.
The journey doesn’t end here—regular maintenance, tweaks, and upgrades will keep your PC running at its best.
📢 Loved This Guide? Stay Connected! 🚀
If you found this PC building guide helpful, don’t keep it to yourself—share it with others who might be looking to build their own PC! 💻✨
💬 Drop a comment below with your thoughts, questions, or your own PC build experience—we’d love to hear from you!
📩 Want more tech tips, expert guides, and the latest deals? Subscribe to our email newsletter and never miss an update! 🚀
🔗 Hit that share button & spread the knowledge! 🔥

Md Afraz Alam is a digital marketing consultant, content strategist, and the founder behind Techfee and USA Tech Deals. Through USA Tech Deals, he shares research-driven home office technology guides, product comparisons, remote work setup tips, and practical tech buying insights designed to help U.S. professionals, freelancers, and remote workers make smarter technology decisions without overspending on the wrong products.